
Ultimate Guide Kedarkantha Winter Trek
The Ultimate Guide to the Kedarkantha Winter Trek via Sankri Route

Your greatest option for winter hiking in India would be the Kedarkantha trek. A beautiful climb in virgin snow, Kedarkantha offers stunning campsites and incredibly spacious forest clearings from December to April. Therefore, choose the Kedarkantha trek if you intend to hike the Himalayas during the winter. You won’t regret it. To get a sense of the walk, check out this amazing blog.
The Top 5 Reasons to Trek Kedarkantha in the Winter, from Snow to April
Few people are aware that the winter snowfall on the Kedarkantha journey begins in mid-December and continues until the third week of April. As you approach 10,000 feet, you will most likely encounter snow, which will be laying on the forest floor amidst the pine trees. There will probably be an enormous blanket of white surrounding you in all directions once you arrive at the meadows.
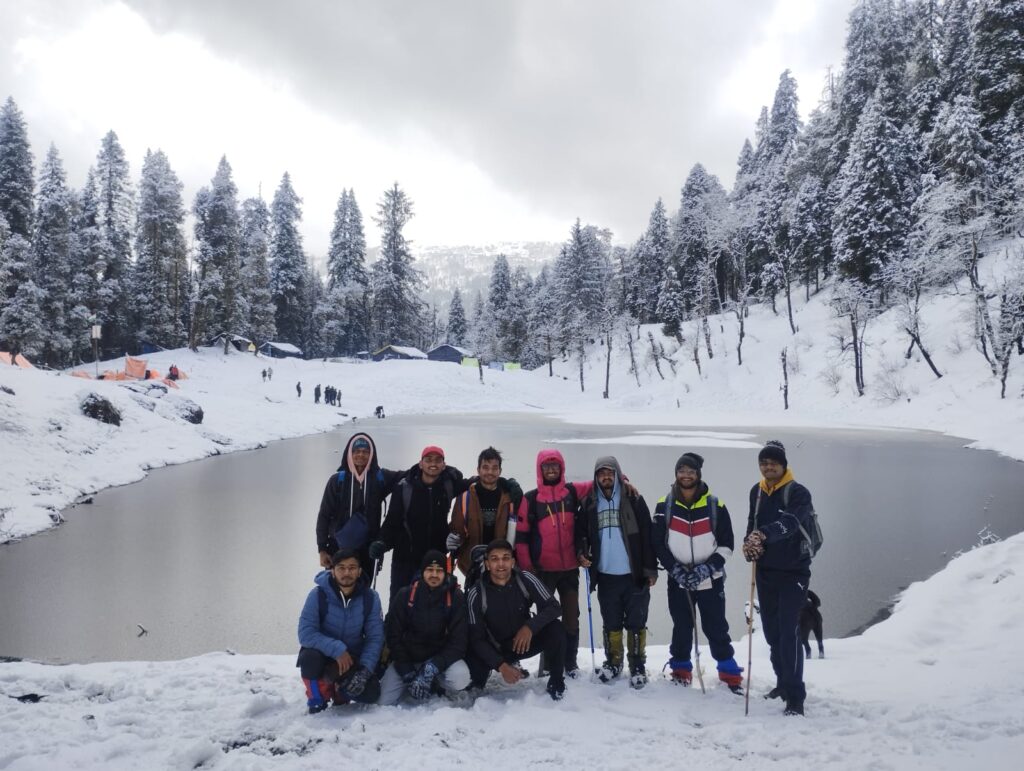
Prettiest campsites
The campsites on this walk among the most beautiful in the Himalayas. The Kedarkantha trip is one of the few treks that can brag about its stunning campsite. The charm of each of its campgrounds is distinct. The Hargaon camp is situated on a clearing of pines and oaks, the Kedarkantha Base camp is situated on an open meadow with snow peaks all around, and the Juda-Ka-Talab camp is situated in a clearing encircled by enormous pine trees. In their lovely surroundings, it nearly seems as though they are in competition with one another.
Best drive in Himalayas
You travel via Mussoorie, Nowgaon, Purola, Mori, and Naitwar on your way to Kedarkantha. One of the most breathtaking drives in the Indian Himalayas, it is a secluded path. Trekkers should pay close attention to the area immediately following Purola until they reach Sankri, the base camp.

The joy of walking on a brown leaves carpet
A thick pine forest is where the Kedarkantha trip begins. A mat of brown leaves always covers the trail. This is a crispy pleasure to walk on!
There are snow peaks everywhere.

One major benefit of trekking Kedarkantha is this. You will be astounded by the breathtaking 360-degree vista of the surrounding prominent mountain summits as soon as you leave the Kedarkantha base camp.Every summit is at eye level as you reach the top of Kedarkantha, giving you the impression that you have touched the sky!
About the trip from Sankri to Kedarkantha
A few brief facts on the Kedarkantha journey are as follows:
It’s easy to moderately difficult. Experience on a trek is not necessary.
The route is round in shape. Sankri is where the journey begins and finishes.
Area: Uttarakhand
Rail head: The closest rail head to the base camp is Dehradun.
Altitude/Height: The hike begins at 6,000 feet and ascends to 12,500 feet.
Sankri is the base camp (10 hours’ travel from Dehradun).
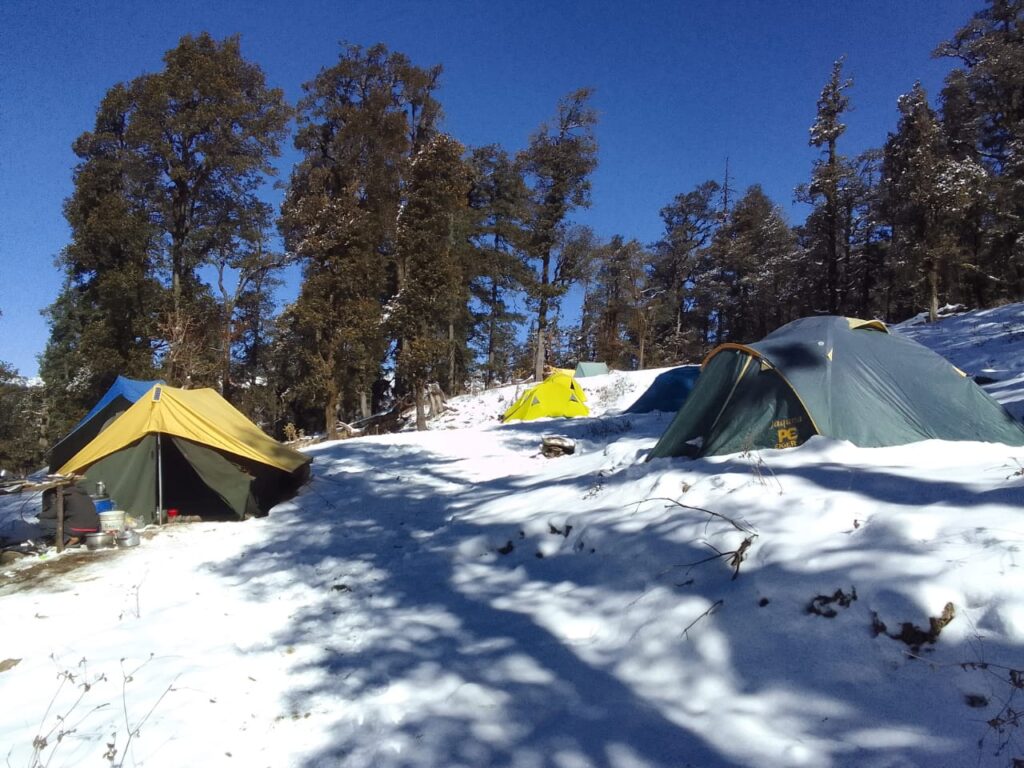
Campsites: Hargaon, Kedarkantha Base, and Juda-Ka-Talab
Winter is the best season. From the middle of December to the end of April, there should be plenty of snowfall.
Keep in mind that the Himalayan winters can occasionally be erratic. Temperatures could dip to about -10 degrees Celsius, making the weather a little challenging to control. Make sure you have at least five layers of warm clothing if you intend to trek the Himalayas during the winter. To find out what seasoned hikers have to say about winter trekking, read this article.
Best time to trek
The optimum time to traverse Kedarkantha is during the winter, from December to April. During these months, the trip is entirely covered in snow. The first snowfall will occur on the first day of the walk, which is from Sankri to Juda Ka Talab.
Further, one of the few treks that may be done in the winter is Kedarkantha. In winter, the Himalayas are not always reachable since most trails receive excessive snowfall, the weather becomes uncontrollable, and the entire expedition becomes impossible. However, Kedarkantha offers you access to a 12,500-foot summit while also promising the ideal quantity of snow! Being at the top at dawn is a divine experience. The massive peaks surrounding you are harmoniously beautiful, and the golden light appears to be from a another era. It is a scene that defies description.
Therefore, you should sign up for the Kedarkantha climb if you wish to hike the Himalayas during the Christmas holidays or possibly begin the New Year at the top.
The following brief information relates to the temperature possibilities:
December to January
During the day, the temperature will be between 13 and 18 degrees Celsius.
The temperature may drop as low as -7 degrees Celsius once the sun sets.
It will get colder as you ascend. There will also be chilly winds at the Kedarkantha base camp. Thus, be sure to have a enough supply of warm clothing.
You can watch this video if you’re concerned about staying warm when trekking at a high altitude.
March To May
It will be between 16 and 20 degrees during the day.
The temperature may drop to 3–4 degrees at night, and it may even dip below zero if there is snow.
Given that snow persists until April, summer vacations would also be an excellent time to go on the Kedarkantha hike. Children can also enjoy this journey because it is classed as easy-moderate!
Challenge
Kedarkantha is a moderate trip in the winter and an easy walk in the summer, according to our ratings. What does this mean now?
First things first, then. The primary determinants of a rek’s degree of difficulty when trekking the Himalayas are:
The pleasure of walking on a carpet of brown leaves
A thick pine forest is where the Kedarkantha trip begins. A mat of brown leaves always covers the trail. This is a crispy pleasure to walk on!
The highest altitude at which it can reach
How is the trail? Is it icy, smooth, slick, or gravely?
For emergency evacuation, how near civilisation is it?
What is the trail’s width and visibility?
What is the trek’s grade (ups and downs)?
Does the trail have any hazardous regions, such as places that are prone to landslides, crevasses, rockfall, or overhangs?
Starting at about 6,000 feet, the Kedarkantha walk ascends to 12,500 feet. This indicates that throughout four days of hiking, you will ascend 6,500 feet. You typically gain about 1,500 feet of height each day, which is a respectable amount of elevation gain in a single day. The majority of the Indian Himalayas need forced ascents, requiring daily ascents of more than 2,000–3,000 feet.
which, although not recommended, cannot be avoided because to the scarcity of campsites in the area. However, the ascent to Kedarkantha is easy, with daily elevation gains of only about 1500 feet.
The trail is easy in terms of terrain. Beautiful trees along the trail from Sankri to Kedarkantha Base. The majority of it is the forest floor, which is delightful to walk on due to its crunchy brown leaves! For the first two days of the hike, you follow this forest floor, and then you start walking on snow.
Kedarkantha would rank extremely low on the difficulty scale when compared to some of the most challenging treks in India, such as the Goechala or Rupin Pass treks. Therefore, if you’re a first-timer seeking to travel the Himalayas in the winter, choose the Kedarkantha trek.
Snow
Naturally, there will be a lot of snow in the Himalayas if you’re going on a winter journey. In the winter, snow will start to appear on the first day of the walk! Thus, wear gaiters and microspikes. You won’t slip and will have a firm grip on the snow thanks to this.
The gradient
In contrast to flat pathways, the Kedarkantha journey requires a fair amount of climbing and descending, despite its seeming ease. You may exhaust yourself with just 30 minutes of continuous climbing. Therefore, bring a trekking pole. You may greatly lessen the strain on your legs by using a trekking pole as a third leg! You can reduce your energy use by as much as 40%! It will also improve your stability and balance. It will greatly improve the comfort of your travel. Here’s how.
Altitude gain
The only thing to be cautious of is making sensible altitude gains. You gain about 2,650 feet on the first day from Sankri to Juda Ka Talab. To ensure that your body acclimates properly, hike at a leisurely pace.
You’ll reach an elevation of 12,500 feet in the following two days, so it’s critical to stay properly hydrated to prevent altitude sickness symptoms.
Before embarking on a high-altitude hike, it is crucial to educate yourself about acute mountain sickness. By watching this video, you can learn more about it and take the necessary safety measures. AMS is rather prevalent when trekking in the Himalayas. You can significantly lower your risk of AMS by taking a dosage of Diamox the day before your trek.
The majority of high altitude trekking hazards are caused by dehydration. Therefore, be sure to drink at least five to six litres of water each day. Water should be consumed as soon as you get up, during your walk and before bed.
Since majority of the trail following Sankri will not have mobile network, emergency communication is challenging. In the event that you are hiking with a group, they will probably have walkie-talkies that connect to the base camp, allowing you to make mobile phone calls.
Preparing for your trek
Whether the hike is easy or challenging, planning is essential for any high altitude adventure.
Fitness
The Kedarkantha trip is rather easy on the first and second days. However, you’ll be wishing you had more endurance on the day of the summit ascent. Make sure you jog for a minimum of one or two months before to the expedition. You must be able to jog four kilometres in twenty-five minutes.
In relation to backpacks, let’s discuss the essentials for the Kedarkantha hike.
Items to bring on the walk
Warm clothing, a comfortable backpack, and a decent pair of trekking shoes are the most essential pieces of equipment for high-altitude walking.
The nighttime low on the Kedarkantha winter trip might be as low as -7 degrees Celsius! Additionally, your bones will freeze if there are chilly winds! Thus, at least five layers of warm clothing are required. You can insulate yourself by layering two t-shirts if you are more likely to feel cold.
To stay warm, you’ll need more than just t-shirts and thermal clothing. You’ll also need a balaclava, wool socks, a nice pair of synthetic gloves, and a neck warmer.
To learn everything there is to know about trekking essentials, watch this video about what to pack for the Kedarkantha trek. Keep your trekking gear simple, your shoes as comfy as possible, and your backpack light if you intend to walk the Himalayas.
About the trek
A thorough account of the Kedarkantha journey can be found below.
Day 1: Arriving at Sankri base camp
220 km
It took ten to eleven hours.
Get at Sankri at 5:30 p.m., having left Dehradhun by 7:30 a.m. The settlement of Sankri is modest and charming. Sankri is made in a few stores and dhabas. Slightly up the road, stay at the GMVN guest house. The majority of hikers arrive at Sankri in the evening, making it an ideal time to see the sun set over the Greater Himalayan mountain ranges. Standing tall over the ridges beyond Sankri, the peaks of Swargarohini gleam in the sunset sun.
Day 2: Juda-ka-Talab in Sankri
6,400 to 9,100 feet above sea level
4 km
It took five hours.
After leaving Sankri, continue on the paved road until you reach Sol, which is an extension of Sankri settlement. The road curves sharply after you pass the village. After about seven or eight minutes, seek for a steeply climbing track to your right that runs alongside a stream. The path that goes to Kedarkantha is this one. Wait for a local to walk by and ask for directions if you’re unsure. After entering the pine forest, the trail begins a steep ascent that lasts for ten minutes until it reaches a ridge.
After an hour, you should see a little wooden bridge to your right. On the walk, around 40 to 50 meters above the bridge, you can see a shepherd’s cottage. Juda-ka-Talab is a fourth of the way away from here.
The stream you have been listening to eventually catches up with you. Fill up your bottles to last till Juda-ka-Talab, which is another thousand feet higher and two and a half hours away. This is your last water point.
Continue on the route that runs to your left instead of taking the one that crosses the bridge; it is easily identifiable and splits off at the stream. Look for a huge tree trunk that has fallen to the ground amid a large grove of maple trees thirty minutes later. Beyond the tree, at the clearing’s southern edge, a shadowy forest eerily beckons. You are halfway through your journey to Juda-Ka-Talab at 8,100 feet.
To return to the scant pine and maple woodland on its northern edge, continue on the trail into the clearing. The trail climbs quickly through dense oaks over a series of switchbacks before finally coming out into the open over a rising mound to welcome you to the breathtaking Juda-Ka-Talab camp site. Juda-Ka-Talab’s location as a camping is almost ideal. On your right is the dense border of a pine and oak forest, and on your left is the sizable lake that was formerly two lakes but is now unified as one. Light barely makes it through the deep jungle. The clearing and campsite at Juda-Ka-Talab are made up of a number of softly sloping mounds. The ridge line that lets in the afternoon light is high above, on your left. The entire region is completely shaded by some of the densest pine forests you will ever come across.
Day 3: Juda ka Talab to Kedarkantha Base
9,100 to 11,250 feet above sea level
Time spent: 2.5 hours; distance: 4 kilometres
The path from Juda Ka Talab is easy to find and uncomplicated. At the lake’s edge, the trail climbs to a ridge. Make a sharp left turn at the ridge and head upward into the thick pine forest.
Although the lake is not visible, the trail continues to the left, staying on the slope just above Juda Ka Talab. The trail climbs quickly, rising roughly 800 feet over Juda Ka Talab before emerging at a ridge in another 30 minutes. The oaks mostly provide companionship when the ridge flattens out.
Proceed along the ridge to the meadow’s edge and begin a steep ascent through the oaks. Half an hour later, the ridge gives way to another broad meadow with a lone shepherd’s hut (Hut Point) on your right. The scenery is breathtakingly gorgeous and demands a respite from the walk. The ascent to the base of Kedarkantha is less than a thousand feet.
After a little ascent, once more beneath the oaks’ shade, the trail leads to a sizable clearing with another shepherd’s cabin on its northern border. For your first breathtaking 180-degree panorama of the snow ranges encircling the summit of Kedarkantha, look behind you.
Under the arid oak trees, the trail changes course and heads northward. The trail climbs gradually in two stages to another clearing, usually over snow. You have reached the location of the Kedarkantha base camp, which is indicated by another run-down shepherd’s house.
A broad arc of white peaks extends from your left to your right. Among the scores, Bandarpoonch, Swargarohini, Kala Nag, and Ranglana are particularly noteworthy.
Note: It frequently gets windy outside, and the cold is severe. Keep enough wool clothing on hand to keep the weather at bay.
Day 4: Kedarkantha Base to Kedarkantha peak; descend to Hargaon camp
- Altitude: 11,250 feet to 12,500 feet to 8,900 feet
- Distance: 6 km
- Time taken: 6 – 7 hours
It’s worth getting out of bed early to witness the sunrise from Kedarkantha Base. From the KK Base, it is easy to see the Kedarkantha peak. Numerous pathways go to the summit.The best way to get to the top of Kedarkantha is to trek up a series of switchbacks and catch the northern ridge. From the Kedarkantha base campground, the ascent to the top takes one and a half hours. A square arrangement of stones with a Trishul pointing skyward marks the peak of Kedarkantha. With a 360-degree perspective of Uttarakhand’s powerful snow-covered peaks, the top dominates the surrounding area.After leaving the top, descend to your camp by a different path that follows Kedarkantha’s southern ridge. The ridge fall to the oak forest below is simple.Note: Many hikers choose to ascend Kedarkantha from the southern ridge and descend via the northern side, depending on the snow level. The southern ridge has less snow, which facilitates ascending. Choose a route based on the snow conditions because both routes take about the same amount of time.Return to your base camp location at Kedarkantha by noon, at the latest. After a little lunch, dismantle your camp and start the journey down to Hargaon.As it climbs and lowers among frozen streams, oaks, and pines, the trail is breathtaking. It passes through tiny clearings around every 30 minutes. The clearings are uncommon in the Indian Himalayas and a distinctive aspect of the Kedarkantha path. The shepherds’ huts mark several of the clearings.Keep going down until you reach Hut Point’s expansive clearing. Go down to the meadow that runs beneath you rather than continuing down the ridge from here. Proceed to your right at the end of the meadow, cross the open stream, and follow the route that descends the slope without crossing the ridge that runs parallel above.After some time, arrive at the group of four shepherds’ huts you observed while ascending from the ridgeline trail.As the trail continues farther and farther from the ridge, it passes the group of four cabins and returns to the dense, dark pine forest that envelops it. After an hour and a half, the trail descends through a magical pine forest to the Hargaon clearing, where it becomes breathtakingly gorgeous.Day 5: Hargaon camp to Sankri
- Altitude: 8,900 feet to 6,400 feet
- Distance: 6 km
- Time taken: 4 hours
The well-paved path to Sankri is easily identified by stones. After a series of switchbacks through the woods, you will reach a brook on your left. Filling up with water is a good idea here. To reach a ridge, the trail levels off and progressively descends through the pine forest. View the expansive, open Har-ki-dun valley from the ridge. As you descend, you are greeted by an apple orchard surrounded by farms growing cauliflower and potatoes. Local farmers’ huts are seen in the horizon, lined up on the right. Although there are many trails leading to Sankri, everyone utilises the five-foot-wide trail, which is the major one. Continue descending until you reach the pine grove, which is located a few hundred feet above Sankri. Here, the trail splits off several times, each leading to a distinct area of Sankri. A sharp left turn off the main route leads to GMVN; wait for a native to show you the way. To finish a magnificent trek in the Uttarakhand Himalayas, descend to GMVN in ten minutes.
Day 6: Drive to Dehradun from Sankri
Travel along the Tonnes River and through beautiful pine forests on your way back to Dehradun. The drive is eight hours long. To obtain a decent view, try to choose a seat at the right window! Take a break for lunch close to Kempty Falls. By 8 p.m., you will be at Dehradun. A video of the Kedarkantha hike is also available here.
